想搭这个博客已经很久了,但并不愿意搭在自己的服务器上,因为在服务器上做各种小实验的时候总会影响网站的访问,另外也不想花精力去做运维的工作,就一直拖了很久。之前也听说过静态博客与Github Pages搭配的方案,但说实话这种方案并不优雅,任何内容的更新都需要推送到Github重新编译,写文章时图片的路径也是个老大难问题。
最近终于下定决心把这个博客搭起来,经过一番调研发现目前最优的方案依然是静态博客,它将页面渲染过程提前到文章撰写阶段,通过牺牲交互性换取更低的运行环境要求,不需要动态语言的参与,只需要搭建在一个可下载的存储服务中即可,如果某个网盘提供直链下载,甚至可以搭建在网盘上。
综上所述,静态网站架构具有以下优点:
- 基本没有运行环境要求,无后端
- 可以搭建在免费的页面托管平台,如Github Pages、Vercel等
- 安全省心,无需维护服务器,无需担心后台密码泄露
当然,也有以下缺点,但可以通过引入第三方服务的方式解决:
- 部署与更新步骤繁琐
- 不支持评论、阅读量统计等需要动态执行环境的功能
网站架构
主流静态网站框架有Hugo、Hexo、以及Github的亲儿子jekyll,最终我选择了Hugo框架,因为Hugo官网中的主题看起来更漂亮一点。
在挑选主题的时候,我在LoveIt和PaperMod之间犹豫了很久,甚至把两个主题都尝试搭了一遍,最终选择了更为简洁大方的PaperMod。
最终敲定的网站架构使用Github pages作为存储服务,并提供Web访问,Hugo作为静态博客框架,PaperMod作为Hugo的主题,并搭配Github Actions进行自动编译与发布。
发布一篇文章的流程是这样的:
- 本地使用Markdown撰写一篇文章
- 通过git同步至github仓库
- Github Actions自动编译成静态站点并部署至Github Pages
配置Hugo
安装Git
Windows只需安装Git for windows即可。
其它系统可以自行参考Git 官方文档 安装。
安装Hugo
以Windows为例:
- 前往最新发布页面下载相应版本
- 解压
- 将可执行文件移至所需的目录
- 将该目录加入PATH环境变量
- 验证Hugo程序可执行:
hugo version
其他系统参考官方文档 Quick Start 。
创建网站
在hugo-blog目录中创建项目:
hugo new site hugo-blog
cd hugo-blog
配置主题
安装主题
安装PaperMod主题:
git init
git submodule add --depth=1 https://github.com/adityatelange/hugo-PaperMod.git themes/PaperMod
更新主题
如果是clone别人的项目,或者是在另一台电脑上重新clone了自己的项目,需要进行初始化:
git submodule update --init --recursive
如果要更新主题:
git submodule update --remote --merge
启用主题
由于Hugo的默认配置文件为toml格式,而PaperMod主题样例配置文件为yaml格式,因此需要删除根目录下的config.toml文件,新建config.yml文件,然后复制PaperMod的样例配置文件https://github.com/adityatelange/hugo-PaperMod/wiki/Installation#sample-configyml,这里给出当前版本的文件,注意该文件可能随着版本更新而变化,请尽量从官方文档获取,以避免配置项更新导致的报错:
baseURL: "https://examplesite.com/"
title: ExampleSite
paginate: 5
theme: PaperMod

enableRobotsTXT: true
buildDrafts: false
buildFuture: false
buildExpired: false

googleAnalytics: UA-123-45

minify:
  disableXML: true
  minifyOutput: true

params:
  env: production # to enable google analytics, opengraph, twitter-cards and schema.
  title: ExampleSite
  description: "ExampleSite description"
  keywords: [Blog, Portfolio, PaperMod]
  author: Me
  # author: ["Me", "You"] # multiple authors
  images: ["<link or path of image for opengraph, twitter-cards>"]
  DateFormat: "January 2, 2006"
  defaultTheme: auto # dark, light
  disableThemeToggle: false

  ShowReadingTime: true
  ShowShareButtons: true
  ShowPostNavLinks: true
  ShowBreadCrumbs: true
  ShowCodeCopyButtons: false
  ShowWordCount: true
  ShowRssButtonInSectionTermList: true
  UseHugoToc: true
  disableSpecial1stPost: false
  disableScrollToTop: false
  comments: false
  hidemeta: false
  hideSummary: false
  showtoc: false
  tocopen: false

  assets:
    # disableHLJS: true # to disable highlight.js
    # disableFingerprinting: true
    favicon: "<link / abs url>"
    favicon16x16: "<link / abs url>"
    favicon32x32: "<link / abs url>"
    apple_touch_icon: "<link / abs url>"
    safari_pinned_tab: "<link / abs url>"

  label:
    text: "Home"
    icon: /apple-touch-icon.png
    iconHeight: 35

  # profile-mode
  profileMode:
    enabled: false # needs to be explicitly set
    title: ExampleSite
    subtitle: "This is subtitle"
    imageUrl: "<img location>"
    imageWidth: 120
    imageHeight: 120
    imageTitle: my image
    buttons:
      - name: Posts
        url: posts
      - name: Tags
        url: tags

  # home-info mode
  homeInfoParams:
    Title: "Hi there \U0001F44B"
    Content: Welcome to my blog

  socialIcons:
    - name: twitter
      url: "https://twitter.com/"
    - name: stackoverflow
      url: "https://stackoverflow.com"
    - name: github
      url: "https://github.com/"

  analytics:
    google:
      SiteVerificationTag: "XYZabc"
    bing:
      SiteVerificationTag: "XYZabc"
    yandex:
      SiteVerificationTag: "XYZabc"

  cover:
    hidden: true # hide everywhere but not in structured data
    hiddenInList: true # hide on list pages and home
    hiddenInSingle: true # hide on single page

  editPost:
    URL: "https://github.com/<path_to_repo>/content"
    Text: "Suggest Changes" # edit text
    appendFilePath: true # to append file path to Edit link

  # for search
  # https://fusejs.io/api/options.html
  fuseOpts:
    isCaseSensitive: false
    shouldSort: true
    location: 0
    distance: 1000
    threshold: 0.4
    minMatchCharLength: 0
    keys: ["title", "permalink", "summary", "content"]
menu:
  main:
    - identifier: categories
      name: categories
      url: /categories/
      weight: 10
    - identifier: tags
      name: tags
      url: /tags/
      weight: 20
    - identifier: example
      name: example.org
      url: https://example.org
      weight: 30
# Read: https://github.com/adityatelange/hugo-PaperMod/wiki/FAQs#using-hugos-syntax-highlighter-chroma
pygmentsUseClasses: true
markup:
  highlight:
    noClasses: false
    # anchorLineNos: true
    # codeFences: true
    # guessSyntax: true
    # lineNos: true
    # style: monokai
新建文章
在网站中添加第一篇文章:
hugo new posts/my-first-post.md
Hugo在content/posts/目录下创建文件,用编辑器打开该文件:
---
title: "My First Post"
date: 2022-11-20T09:03:20-08:00
draft: true
---
注意draft的值是true,表示当前文档是草稿。默认情况下,Hugo在编译网站时不会发布草稿。
以markdown格式在文件中编写文章,这里是官方给出的示例:
---
title: "My First Post"
date: 2022-11-20T09:03:20-08:00
draft: true
---
## Introduction

This is **bold** text, and this is *emphasized* text.

Visit the [Hugo](https://gohugo.io) website!
保存文件,然后开启Hugo的开发服务器,使用下面的命令来包含草稿文章:
hugo server -D
控制台会输出本地网站的URL。当文章的内容有修改时,Hugo会自动重新编译网站。
发布网站
发布网站是指Hugo在public目录下编译生成静态页面,包含HTML文件、图片、CSS文件以及JS文件。但此时网站还没有部署,我们需要搭配Github Pages将生成的静态界面部署在服务器上。
如果使用Github Actions自动发布与部署,则本地发布的步骤可以省略。
使用下列命令发布网站:
hugo
定制网站
修改网站基本信息
PaperMod的示例配置文件并不能满足我们的需求,需要进行逐一定制,这里列出一些建议修改的配置项:
baseURL: "https://xxx.github.io/" # 首页地址
title: "xxx's blog" # 首页标题

# googleAnalytics: xxx # google analytics在国内无法访问,需要注释掉以加快访问速度

params:
  title: "xxx's blog" # 首页标题
  description: "xxx" # 页面描述
  keywords: [Blog, xxx] # 首页的关键词
  author: xxx # 文章中默认显示的作者名字
  DateFormat: "2006-01-02" # 将时间格式修改为国内常用格式
  ShowCodeCopyButtons: true # 显示复制代码按钮
  showtoc: true # 在每篇文章开头显示目录

  # 各种图标的地址,如果没有就全部注释掉
  # assets:
    # favicon: "<link / abs url>"
    # favicon16x16: "<link / abs url>"
    # favicon32x32: "<link / abs url>"
    # apple_touch_icon: "<link / abs url>"
    # safari_pinned_tab: "<link / abs url>"

  # PaperMod支持Regular、Home-Info和Profile三种模式,具体参阅 https://github.com/adityatelange/hugo-PaperMod/wiki/Features#regular-mode-default-mode
  profileMode:
    enabled: false # needs to be explicitly set
    title: "xxx's blog"
    subtitle: "This is subtitle"
    imageUrl: "<img location>"
    imageWidth: 120
    imageHeight: 120
    imageTitle: my image
    buttons:
      - name: Posts
        url: posts
      - name: Tags
        url: tags
  homeInfoParams:
    Title: "xxx"
    Content: xxx

  socialIcons:
    - name: github
      url: "https://github.com/xxx" # 个人Github地址
    - name: email
      url: "mailto://xxx@xxx.com" # 个人邮箱

  # 用于搜索引擎验证网站所有权,如果不用就注释掉
  # analytics:
    # google:
    #   SiteVerificationTag: "XYZabc"
    # bing:
    #   SiteVerificationTag: "XYZabc"
    # yandex:
    #   SiteVerificationTag: "XYZabc"

  editPost:
    URL: "https://github.com/xxx/xxx.github.io/blob/main/content" # 填入Github仓库的地址
    Text: "提交修改建议"
    appendFilePath: true # 是否在URL后加入文件路径

# 网站右上角的菜单列表
menu:
  main:
    - identifier: archives # 需做额外配置,具体参考下文
      name: 归档
      url: /archives/
      weight: 10
    - identifier: categories
      name: 分类
      url: /categories/
      weight: 20
    - identifier: tags
      name: 标签
      url: /tags/
      weight: 30
    - identifier: search # 需做额外配置,具体参考下文
      name: 搜索
      url: /search/
      weight: 40
添加搜索页面
PaperMod使用 Fuse.js Basic 实现搜索功能。
在config.yml中加入下列配置项:
outputs:
    home:
        - HTML
        - RSS
        - JSON # is necessary
在content目录下创建search.md,内容如下:
---
title: "搜索" # in any language you want
layout: "search" # is necessary
summary: "search"
placeholder: "搜索框中的提示语"
---
如果要使某篇文章不被搜索,在文章开头添加下列配置项:
---
searchHidden: true
添加归档页面
在content目录下创建archives.md,内容如下:
---
title: "归档"
layout: "archives"
url: "/archives/"
summary: archives
---
汉化主题
PaperMod的默认语言是英文,中文支持并不是很好,需要进行一些额外的汉化操作。
修改config.yml文件,添加如下配置项:
languageCode: zh
defaultContentLanguage: zh
此时大部分页面已显示为中文,但标签、分类、文章界面的标题依然是英文,因此需要对这些页面进行覆写。
新建content/tags/_index.md,内容如下:
---
title: "标签"
---
新建content/posts/_index.md,内容如下:
---
title: "文章"
---
新建content/categories/_index.md,内容如下:
---
title: "分类"
---
添加访问量统计功能
由于Hugo是静态框架,不具备动态执行能力,因此访问量统计功能需要引入第三方服务实现。下面以PaperMod为例引入不蒜子busuanzi统计工具。
引入js文件
第一步需要在<head>标签内引入不蒜子的js文件。
Hugo提供了在不修改themes/PaperMod/layouts/partials/head.html的情况下自定义页面头的能力,这样就不需要修改themes/PaperMod下的文件,保证更新主题后不需要额外进行修改。
在项目根目录的layouts/partials下新建extend_head.html,加入如下代码,引入js文件:
{{- /* Head custom content area start */ -}}
{{- /*     Insert any custom code (web-analytics, resources, etc.) - it will appear in the <head></head> section of every page. */ -}}
{{- /*     Can be overwritten by partial with the same name in the global layouts. */ -}}
<!-- busuanzi -->
{{- if site.Params.busuanzi.enable -}}
  <script async src="https://busuanzi.ibruce.info/busuanzi/2.3/busuanzi.pure.mini.js"></script>
{{- end -}}
显示总访问量和访客数
接下来要在页面底部添加总访问量和访客数的显示代码,要修改的文件是themes/PaperMod/layouts/partials/footer.html。
尽管可以使用extend_footer.html扩展footer.html,但我们想要使用主题本身的footer样式,就需要将显示访问量的标签嵌入<footer>代码块内,而使用extend_footer.html是没办法做到的,因此只能直接对footer.html进行修改。
万幸的是,Hugo允许在layouts/目录下添加自定义的页面,覆盖themes/PaperMod/layouts/目录下的同名文件,而无需修改themes/PaperMod/目录下的任何文件。
将themes/PaperMod/layouts/partials/footer.html复制到layouts/partials/footer.html,在<footer>代码块内添加如下代码:
    <!-- busuanzi -->
    {{ if site.Params.busuanzi.enable -}}
    <div class="busuanzi-footer">
    <span id="busuanzi_container_site_pv">
        本站总访问量<span id="busuanzi_value_site_pv"></span>次
    </span>
    <span id="busuanzi_container_site_uv">
        本站访客数<span id="busuanzi_value_site_uv"></span>人次
    </span>
    </div>
    {{- end -}}
修改后的文件如下所示(已做简化):
<footer class="footer">
    ...
    <span>
        Powered by
        <a href="https://gohugo.io/" rel="noopener noreferrer" target="_blank">Hugo</a> &
        <a href="https://github.com/adityatelange/hugo-PaperMod/" rel="noopener" target="_blank">PaperMod</a>
    </span>

    <!-- busuanzi -->
    {{ if site.Params.busuanzi.enable -}}
    <div class="busuanzi-footer">
    <span id="busuanzi_container_site_pv">
        本站总访问量<span id="busuanzi_value_site_pv"></span>次
    </span>
    <span id="busuanzi_container_site_uv">
        本站访客数<span id="busuanzi_value_site_uv"></span>人次
    </span>
    </div>
    {{- end -}}

</footer>
修改single.html
用于显示每篇文章的阅读量,需要对themes/PaperMod/layouts/_default/single.html做修改。
与上一节的方法类似,将themes/PaperMod/layouts/_default/single.html复制到layouts/_default/single.html,在<div class="post-meta">代码块内添加如下代码:
<!-- busuanzi -->
{{ if site.Params.busuanzi.enable -}}
 · <span id="busuanzi_container_page_pv">本文阅读量<span id="busuanzi_value_page_pv"></span>次</span>
{{- end }}
修改后的文件如下所示(已做简化):
<header class="post-header">
...
{{- if not (.Param "hideMeta") }}
<div class="post-meta">
{{- partial "post_meta.html" . -}}
{{- partial "translation_list.html" . -}}
{{- partial "edit_post.html" . -}}
{{- partial "post_canonical.html" . -}}
<!-- busuanzi -->
{{ if site.Params.busuanzi.enable -}}
 · <span id="busuanzi_container_page_pv">本文阅读量<span id="busuanzi_value_page_pv"></span>次</span>
{{- end }}
</div>
{{- end }}
</header>
修改config.yml
在config.yml的params中添加两行:
params:
    busuanzi:
        enable: true
在Github Pages上部署网站
本节主要参考自官方文档,点此查看原文。
创建Github远程仓库
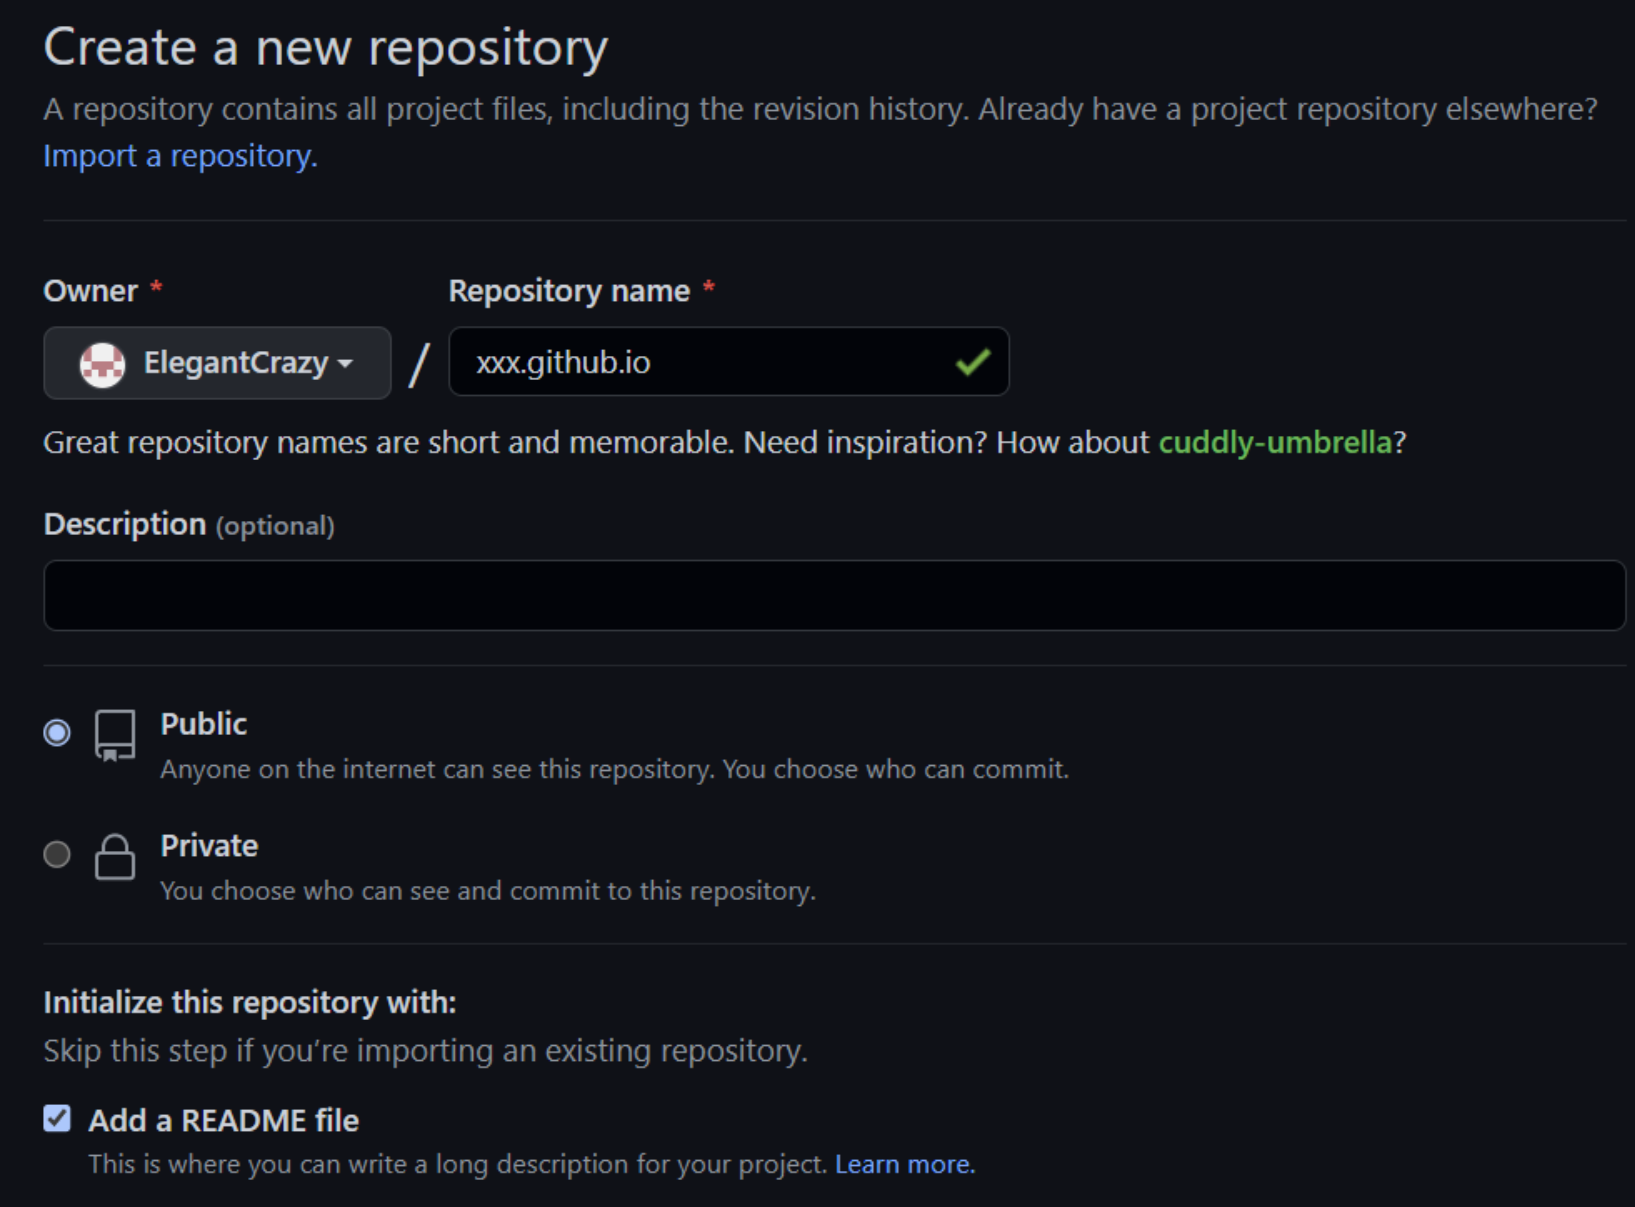
在Github创建仓库,仓库名填写[用户名].github.io,注意[用户名]部分必须是Github用户名,否则Github Pages不会正常工作。
勾选Add a README file,点击Create Repository,创建仓库。
将本地仓库推送至Github
在项目根目录下创建本地仓库:
git init
在根目录下创建.gitignore,内容如下:
public
resources
.hugo_build.lock
关联远程仓库,记得把[username]替换为用户名:
git remote add origin git@github.com:[username]/[username].github.io.git
创建一次提交:
git add .
git commit "Hugo website with PaperMod theme"
关联远程main分支,并推送至远程仓库:
git push --set-upstream origin main
配置Github Pages
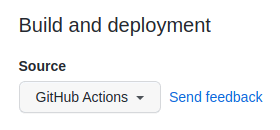
访问Github仓库,选择 Settings > Pages ,在屏幕中间可以看到:
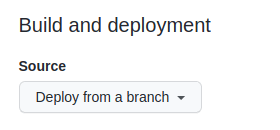
将 Source 切换至GitHub Actions,修改会立即生效,不需要点击Save。
配置Github Actions
在本地仓库中创建文件.github/workflows/hugo.yaml,内容如下:
# Sample workflow for building and deploying a Hugo site to GitHub Pages
name: Deploy Hugo site to Pages

on:
  # Runs on pushes targeting the default branch
  push:
    branches:
      - main

  # Allows you to run this workflow manually from the Actions tab
  workflow_dispatch:

# Sets permissions of the GITHUB_TOKEN to allow deployment to GitHub Pages
permissions:
  contents: read
  pages: write
  id-token: write

# Allow one concurrent deployment
concurrency:
  group: "pages"
  cancel-in-progress: true

# Default to bash
defaults:
  run:
    shell: bash

jobs:
  # Build job
  build:
    runs-on: ubuntu-latest
    env:
      HUGO_VERSION: 0.111.2
    steps:
      - name: Install Hugo CLI
        run: |
          wget -O ${{ runner.temp }}/hugo.deb https://github.com/gohugoio/hugo/releases/download/v${HUGO_VERSION}/hugo_extended_${HUGO_VERSION}_linux-amd64.deb \
          && sudo dpkg -i ${{ runner.temp }}/hugo.deb
      - name: Install Dart Sass Embedded
        run: sudo snap install dart-sass-embedded
      - name: Checkout
        uses: actions/checkout@v3
        with:
          submodules: recursive
          fetch-depth: 0
      - name: Setup Pages
        id: pages
        uses: actions/configure-pages@v3
      - name: Install Node.js dependencies
        run: "[[ -f package-lock.json || -f npm-shrinkwrap.json ]] && npm ci || true"
      - name: Build with Hugo
        env:
          # For maximum backward compatibility with Hugo modules
          HUGO_ENVIRONMENT: production
          HUGO_ENV: production
        run: |
          hugo \
            --gc \
            --minify \
            --baseURL "${{ steps.pages.outputs.base_url }}/"
      - name: Upload artifact
        uses: actions/upload-pages-artifact@v1
        with:
          path: ./public

  # Deployment job
  deploy:
    environment:
      name: github-pages
      url: ${{ steps.deployment.outputs.page_url }}
    runs-on: ubuntu-latest
    needs: build
    steps:
      - name: Deploy to GitHub Pages
        id: deployment
        uses: actions/deploy-pages@v1
注意环境变量HUGO_VERSION需要与本地hugo版本一致,可以执行下列命令查看:
hugo version
创建一次提交,推送至远程:
git add .
git commit -m "Add workflow"
git push
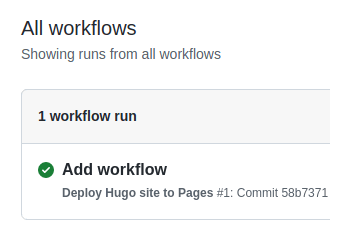
在Github仓库页面,点击 Actions ,可以看到工作流的状态:
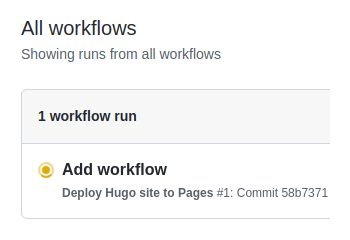
当Github完成了生成与部署工作,状态标识的颜色会变成绿色:
点击上面显示的commit信息,可以看到这个:
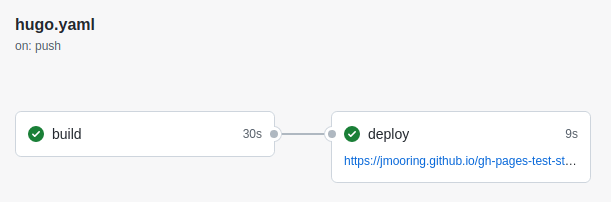
在deploy步骤下,可以看到网站的链接。
此后对此仓库的每次提交都会触发Github Actions的自动生成和部署。
总结
以上就是使用Hugo+Github Pages+PaperMod搭建博客的全部流程,搭建好的博客具有以下特性:
- 静态页面无需本地生成,更新时只需提交源码文件
- 支持总访问量、访客数、文章阅读数统计
- 全站汉化,所有资源国内均可直连
如果想要添加评论功能,可以参考我的下一篇文章。
本文搭建的博客开源在我的项目仓库ElegantCrazy/ElegantCrazy.github.io中,大家也可以直接clone我的项目,简单配置后就可以快速拥有自己的个人博客了。